
Ever wonder how you can add chipboard to your Tonic Keepsake Memory Books?
The Book Maker dies make mini-album-creating so incredibly quick and easy. I LOVE using these dies to create mini-albums of all shapes, sizes and varieties!
BUT… adding chipboard to mini-albums created with these die sets is a challenge. Because the dies themselves are so thin, using the dies to cut through chipboard is almost impossible.
UNTIL NOW!
After much trial-and-error, I have come up with an easy way to add the strength and durability of chipboard to your next Tonic Keepsake Memory Book Album.


The Tonic Base Creator dies and the Tonic spine die WILL cut through a regular beverage box, cereal box, cracker box, etc. Cut 4 pieces for the front and back cover. You will see a perforation line next to a “score” line (slight indentation). Using scissors, cut close to the perforation so it matches the opposite side. Trim all 4 pieces the same way. I trim my first piece and then use that as a guide to trim the other 3 pieces.


Lightly sand the glossy sides of the cardboard and glue 2 pieces together. If you want a thicker cover, glue 3 pieces together.

For this project, I am using mini album cover paper by Craft O’Clock. This is my absolute favorite way to create and cover my mini-albums. The paper is created to withstand the effects of using liquid glue and the outside wear-and-tear of typical mini-album handling. And the designs are wonderful for lots of different projects (many of the paper collections also have a coordinating cover paper!).

See more Craft O’Clock cover paper designs HERE:

Covers
Mini-album covers by Craft O’Clock – extra-long, extra-strong, specially-treated paper designed to create album covers with one seamless sheet.
Add your own adhesive.
Made in Poland by Craft O’Clock and available in the USA.

I used small cover #6 to create my spine hinge. First, I cut the small cover in half. I die cut a spine from one half of the paper. Then, using the same die I cut the outside cover, I measured and marked my spine paper to match the size of cover die. Before I even create the folds for the hinge, I trim the spine paper to match the size of the outside covers.


Fold and tape the spine hinge. If you are new to this process, you ONLY place double-sided tape on the scored columns of the hinge piece that have the notch marking. Then, you fold each set of 2 adjacent taped pieces together. This creates 3 little mountain-folds in the paper. You can always die cut additional spine pieces, tape and fold them, and extend your spine hinge to include as many little mountain-folds as you like. Each mountain fold holds a single page of the mini-album.

Watch a step-by-step video of the process HERE:
Use scissors to trim the outside edge of each mountain fold at an angle toward the outside. This will help the pages slide in easily.

Use the spine die to cut 2 pieces of cardboard. Lightly sand the glossy side and glue the 2 pieces together. If you used 3 pieces for the cover, however, also use 3 pieces for the spine. Measure the spine cardboard piece to match the same size as the folded spine hinge paper.

Remember earlier how we cut the small cover paper in half? Locate the remaining half of that paper and use it as the “wing” piece. The spine hinge needs to be adhered to a larger piece of paper, and using the same design creates a seamless look. Plus, using this specially-designed cover paper adds strength and durability to the mini-album.


Adhere the cardboard spine piece to the BACK of the center of the spine hinge. If you are using liquid glue, place a book or heavy object on top of the cardboard until the glue dries.


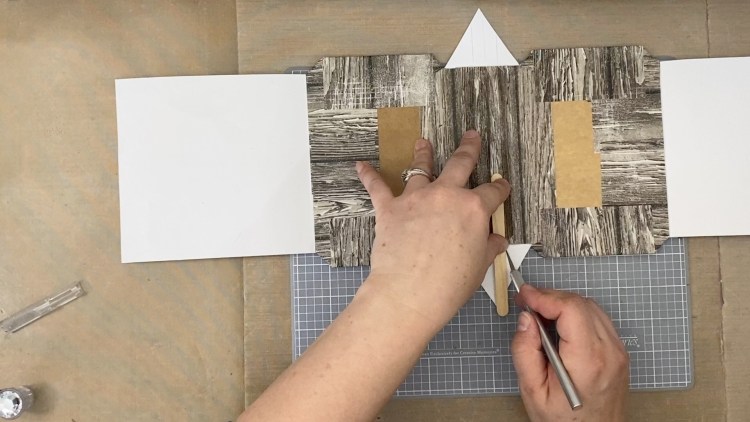
Turn the entire spine hinge piece upside down on your table so the mountain folds are face-down. We will be gluing the cover pieces to the wings; BUT FIRST, we need to mark about 1/8″ (.32 cm) on each side of the cardboard spine. I use 2 Popsicle-craft sticks as a little size-guide to mark my spaces. Once you make those marks, DO NOT add ANY adhesive inside that marked space.


Adhere the front and back covers to the “wings”. Make sure to go right up against the mark you just created.


Add liquid glue to the cardboard spine and glue the SPINE ONLY to the large cover paper. My favorite liquid glue is Nuvo Deluxe Adhesive by Tonic. It is super-strong, dries quickly and rarely clogs. Plus (this is just a personal preference) I like the “feel” and size of the bottle. It’s very comfortable to use. Take great care to burnish the glued cover against the spine.

Once the spine is adhered, fold up the chipboard cover pieces individually and glue them to the cover the same way. Make sure to spend quality time burnishing the cover to the glued chipboard. Place a book or heavy object on top of the cover until the glue fully dries.

Use a “T-ruler” or other straight edge and a craft knife to cut flaps in the cover paper. The Base Creator die sets have lovely decorative corners, and I hated the possibility of sacrificing the embellished corners for the sake of adding chipboard. But, I learned that if I spent time and detail on this step, it still turned out looking fantastic. Take care as you glue and fold the flaps into the inside cover. I even used a Popsicle-craft stick as a straight-edge to cut tiny flaps and glue them inside the hinges. This will add strength to my spine and continue to create that seamless look.


Once all the flaps are glued inside the cover, let the entire cover dry completely with a heavy object resting on top. Once dry, gently and slowly work the front and back covers until your cover closes. Then, add your pages as desired. When you add pages, choose a die that is one size smaller than you used for the cover. Die cut 2 pieces of patterned paper for each page, and adhere one piece to the hinges (one piece on each side). Do NOT go flush against the spine when you adhere the pages. Make sure to leave a little room for the pages to fold open.
Here is a closer look at the finished mini-album. Isn’t it gorgeous?


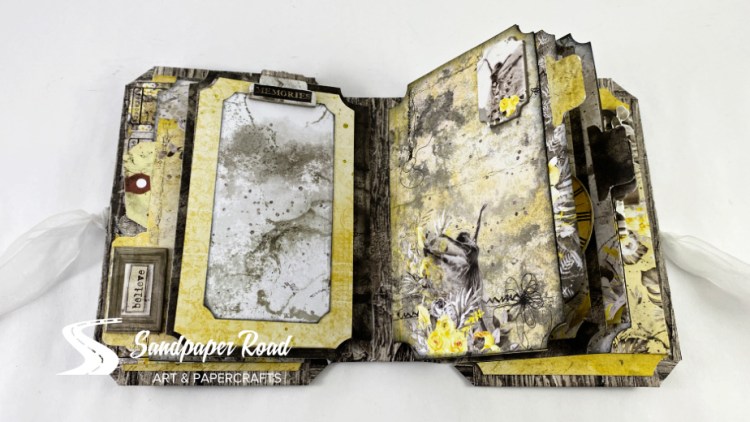


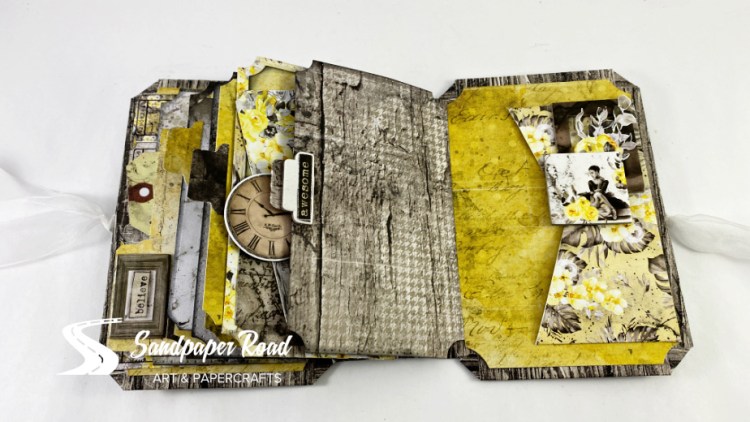
For this project, I used the “Force of Gentleness” paper collection by Craft O’Clock. I absolutely LOVE the yellow and gray colors and the dancers are just incredible! The completed mini-album size is 6-1/2” x 4-1/2” x 2″ (16,5 cm x 11,43 cm x 5,08 cm). This album includes three full pages (each with a hidden pocket) plus three additional fold-out pages and several little pockets, flaps and envelopes to hold photos, ephemera and memorabilia. What a lovely little gift to hold memories from a dance recital or elegant night at the ballet!

If you learned something from this post, consider “buying a coffee” for Sandpaper Road as a way of saying “thanks”. Your contributions help support Sandpaper Road so I can continue to bring you well-prepared and informative tutorials, videos and blog posts. Thank you very much in advance for your support!

Thank you for looking! Don’t forget to follow the Sandpaper Road blog so you never miss a dose of crafty inspiration!
SUPPLIES USED –
Memory Book Base Creator Die Set by Tonic (discontinued);
Spine Die by Tonic;
Force of Gentleness Paper Collection by Craft O’Clock:
20,3 cm x 20,3 cm (8” x 8”);
15,25 cm x 15,25 cm (6″ x 6″);
Extras to Cut;
Junk Journal Extras to Cut;
Flowers 27;
Leaves 15;
Chipboard Die Cuts;
Decorative Cards;
Small Cover #6 by Craft O’Clock;
Large Cover #6 by Craft O’Clock;
3D Matte Gel by Prima;
Nuvo Deluxe Adhesive;
Scor-Tape .64 cm (1/4”) and 1,27 cm (1/2”);
Hot glue gun/glue sticks;
Scissors by Tonic 12,7 cm (5”) detail scissors and 22,86 cm (9”);
Small magnets by K&J Magnetics;
Ribbon & metal embellishments.
Sandpaper Road is an affiliate partner with some of the companies linked in this post. You don’t pay any extra when you make a purchase through one of these links, and Sandpaper Road may also earn a small commission. Thank you for your support!
Check out these other projects I made with these die sets from Tonic!

Tutorial | TONIC Base Creator Die Set | Sandpaper Road
This beautiful mini album in decadent colors is lovely to keep for yourself or give as a gift. Holds several photos and includes numerous pockets for decorative cards, ephemera or additional photos. Gorgeous chipboards, flowers and leaves accent the project. #sandpaperroad #minialbum #tutorial #stepbystep #guide #tonic #basecreatordie #spinedie #minibook #scrapbooking…
Keep reading
Mini Album | Tonic Memory Book Maker Die Set | Craft O’Clock Paper
Walk with me as I show you today’s creation – a lovely little mini-album using the Memory Book Maker Die Set by Tonic and the “Lavender Hills” paper collection by Craft O’Clock. #sandpaperroad #tonic #memorybook #memorykeeping #craftoclock #craftoclockpaper #diy #minialbum #papercrafting #scrapbooking #keepsake #garden #lavender #spinedie
Keep reading